Mobile Push Notifications with PubNub
In this tutorial, you'll discover how to add mobile push notifications to a chat application.
 Start Android (Kotlin) tutorial

Mobile Push Notifications for iOS Swift Environment Setup
This tutorial will guide you through how to add mobile push notifications to an iOS Swift chat application. You'll be using PubNub to construct and send push notification payloads to the Apple Push Notification Service (APNs) to deliver the notifications to your device.
Prerequisites
You'll need the following before you begin:
Xcode (The latest stable version)
Apple Developer Account with access to the Apple Developer Program.
You'll need to be enrolled in this program in order to access services that allow your application to receive mobile push notifications from APNs.
Please note that this is a paid program.
Physical iOS Device (iPhone, iPad, iPod Touch, etc)
Simulated devices in Xcode cannot be registered in APNs, and thus cannot receive a device token, which is necessary when sending mobile push notifications across the PubNub network.
Download Source Application
Download PubNub's getting started iOS Swift chat app from the GitHub Repository. This 1:1 chat application utilizes the community supported Chat Components, which are pre-built UI and data building blocks to quickly build a proof of concept or get your application to market.
In a terminal, navigate to an empty folder of your choosing. Enter the following command to clone the Repository.
git clone https://github.com/PubNubDevelopers/ios-push-notifications-tutorial.git
Checkout the base-application branch to begin working with the source application.
git checkout base-application
Watch the video or follow the steps below to set up your environment.
Create APNs Authentication Token
You will be using the Apple Push Notification Service (APNs) as the push service provider to deliver mobile push notifications to the application. You need to first create an APNs Authentication Token which is required if you want to receive mobile push notifications.
Navigate to your Apple Developer Account.
In the Program Resources section, click Certificates, IDs & Profiles.
Click on the Keys tab. You will create your APNs Authentication Token.
Register a new key by providing a name. Enable Apple Push Notifications service (APNs) by checking the checkbox. Click Continue.
Click Continue, and download the token. The token file
AuthKey_<key id>.p8will be used later on when creating your PubNub keys.
Enable Mobile Push Notifications in Xcode
For APNs to be able to deliver mobile push notifications to your application, you'll need to uniquely identify your application and enable the Push Notifications Capability in the Xcode project.
Open your project in Xcode. Sign in using your developer account if you have not done so.
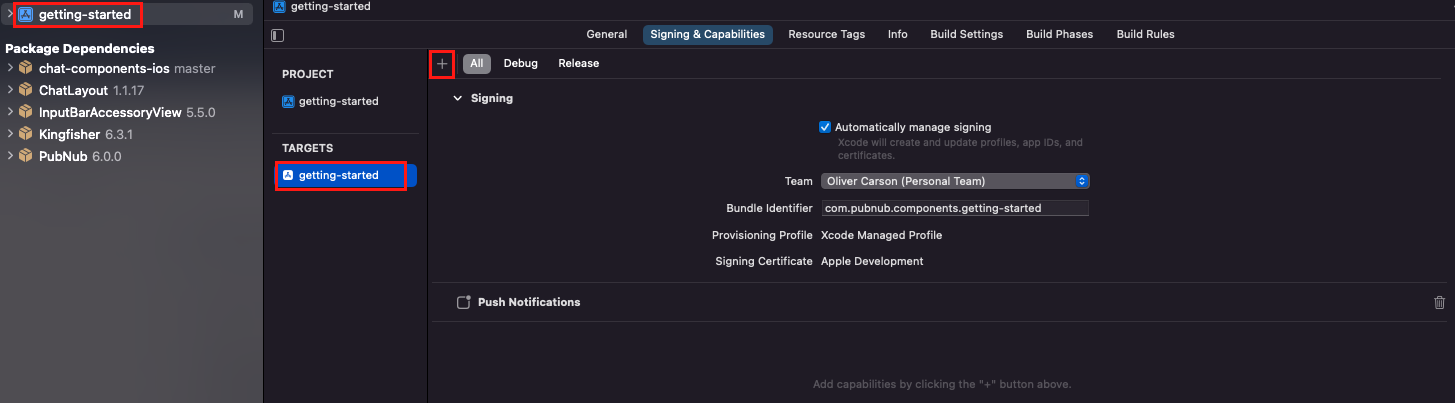
In the project navigator, click on the project file. In the Targets section, click on your project.
In the General tab, enter a unique Bundle Identifier by appending something like -push at the end of the ID. APNs identifies your application in a provisioning profile by combining a Team ID (generated by Apple) and your Bundle Identifier as an explicit App ID to be able to use certain capabilities, including receiving mobile push notifications for your application.
Click on the Signing & Capabilities tab.
Ensure that the checkbox for "Automatically manage signing" is checked.
In the Signing section, ensure that your developer account is selected in the Team drop-down.
Ensure the Bundle Identifier is the same as that in the General tab.
Add Push Notification support to your application by clicking on the
+symbol, search for "push notifications", and then double click the Capability to add to your application.
Add Packages
This application utilizes the PubNub Swift SDK and Chat Components for iOS libraries. Add these packages by clicking on File -> Add Packages and entering the following Package URL.
https://github.com/pubnub/chat-components-ios
Ensure you select both the PubNubChat and PubNubChatComponents library package products. Click Add Package to add them to your application.
Navigate to AppDelegate.swift. At the top of the file, ensure that the PubNub library necessary to be able to use the PubNub Swift SDK is already imported. Add the UserNotifications library to be able to use mobile push notifications in your project.
import PubNub //Ensure the PubNub library is imported
import UserNotifications //Add this one.
Connect Device
Connect your physical Apple Device to your computer. A pop-up in Xcode will ask if you want to register your device. Be sure to register to do so, as it will be linked to your Apple Developer Account.
Create keys
My own keys
You'll need to create an account to use your own keysSign in to your PubNub Dashboard.
Go to Apps using the left-hand side navigation.
Click the "Create New App" button.
A pop-up appears. Give the app a name and click the "Create" button.
Go to Keysets using the left-hand side navigation.
Click the “Create New Keyset” button.
A pop-up appears. Give the keyset a name and click the “Create” button.
Click on the newly created keyset.
Enable four features for the keyset to be able to connect to the PubNub Network: Presence, Message Persistence, Stream Controller, and Mobile Push Notifications.
Enable Presence by clicking on the slider to turn it on. A pop-up will require that you enter in “ENABLE”. Enter in “ENABLE” in all caps and then press the “Enable” button. You can leave the default settings.
Enable Message Persistence by clicking on the slider to turn it on. You can leave the default settings.
Enable Stream Controller by clicking on the slider to turn it on if it is already not enabled. You can leave the default settings.
Enable Mobile Push Notifications by clicking on the slider to turn it on. In the Apple Push Credentials section, you need to upload the APNs Authentication Token file. This file is obtained from your Apple Developer Account when you create your Key in Certificates, Identifiers & Profiles -> Keys -> Register a New Key -> Give the key a name and enable APNs -> Click continue, register, and then download. If you no longer have access to the token file, you'll need to register and create a new key. Upload the token file. Enter in the Team ID and Auth Key ID fields found in the following locations in your Apple Developer Account:
Team ID: Overview -> Membership -> Team ID.
Auth Key ID: Overview -> Certificates, IDs & Profiles -> Keys -> <key name> Key ID in View Key Details.
Click on the “Save Changes” button in the bottom right corner of the portal. After a few seconds, a confirmation message will appear in the upper-left corner of the portal confirming that these changes have been saved.
Scroll back to the top of the portal. Copy the Publish key by clicking on the copy icon and paste it below
Copy the Subscribe Key by clicking on the copy icon and paste it below.
Build and run
Watch the video or follow the steps below to build and run your application.
The completed application is located in the push-notifications branch in the PubNub GitHub repository.
//This code box will update soon as you
//progress through the video
//Use the copy icon in the top right to quickly copy
//code as you're following along
Step 1. Add PubNub Keys
Open PubNubConnection.swift in the getting-started folder. This singleton class is used to provide a globally accessible, shared instance of the PubNub object used to connect to the PubNub Network. This class is especially useful if you expand upon this project by adding more screens to the application.
Copy the publish and subscribe keys above and replace the values for the PUBNUB_PUBLISH_KEY and PUBNUB_SUBSCRIBE_KEY constants respectively.
import Foundation
import PubNub

final class PubNubConnection {
    //PubNub Keys
    private static let PUBNUB_PUBLISH_KEY = "PUBLISH_KEY" //Place Publish Key here
    private static let PUBNUB_SUBSCRIBE_KEY = "SUBSCRIBE_KEY" //Place Subscribe Key here
    static let shared : PubNub = PubNub(
        configuration: PubNubConfiguration(
          publishKey: PUBNUB_PUBLISH_KEY,
          subscribeKey: PUBNUB_SUBSCRIBE_KEY,
          uuid: String(NSUUID().uuidString.prefix(6)) // UUID will be first 6 characters
        ))
    private init() {}
}
Step 2. Add Properties
Navigate to AppDelegate.swift. The rest of this tutorial will take place in this file. Add two properties, pubNub, which contains the shared PubNub object and pushChannels, which is the list of channels you want to register your device on the PubNub network.
let pubNub = PubNubConnection.shared //Shared PubNub connection object.
let pushChannels: [String] = ["Default", "ch1"]
Step 3. Initializing the App
In the method application(_:didFinishLaunchingWithOptions:), which allows you to perform any actions when the application is almost ready to run, add the following before the return true line:
UNUserNotificationCenter.current().delegate = self //1. Need to assign delegate object before app finishes launching. Might miss incoming notifications otherwise.
//2. Requires user authorization before displaying notifications on device.
UNUserNotificationCenter.current().requestAuthorization(options: [.badge, .alert, .sound]) { (granted, err) in
   guard granted else {return} //Do not continue if not authorized.
   DispatchQueue.main.async() {
      UIApplication.shared.registerForRemoteNotifications() //3. Request device token.
   }
}
The code performs three important operations:
UNUserNotificationCenter is the shared, central object to manage all notification-related behaviors in your app or app extension. You need to assign the delegate object to the UNUserNotificationCenter object in order to not miss any incoming notifications before the app finishes launching.
In order to display notifications for your application, you must obtain permission for authorization by calling
UNUserNotificationCenter.requestAuthorization(options:completionHandler:). If you do not, you will be unable to display any local or remote notifications.If the user of the application has authorized permission to display notifications on that device, you need to register your application with APNs and receive a globally unique device token by calling
UIApplication.shared.registerForRemoteNotifications(). This is how both APNs and PubNub recognize that your device is authorized and registered to receive mobile push notifications.
Step 4. Receive & Register the Device Token
Add the method application (_:didRegisterForRemoteNotificationsWithDeviceToken deviceToken:), which is called if the device has successfully registered with APNs. In this method, you'll pass the device token to a method that will register the device token on the PubNub network in a provided list of channels, which is necessary for PubNub to send any mobile push notification payload to APNs to deliver to devices.
You'll also want to handle any failed device registrations with APNs by adding the application(_:didFailToRegisterForRemoteNotificationsWithError:) method. A device can fail to register if APNs network is unreachable, the device is not online, and so on. Although currently this function is simply printing the cause of the error, you would normally set a flag and try to register the device with APNs after a certain period of time.
//Successfully registered and received device token from APNs. Register device on PubNub network.
func application(_ application: UIApplication, didRegisterForRemoteNotificationsWithDeviceToken deviceToken: Data) {
     addDevice(deviceToken: deviceToken) //Registers device token on PubNub network.
}

//Failed to register and receive a device token from APNs.
func application(_ application: UIApplication, didFailToRegisterForRemoteNotificationsWithError error: Error) {
    print("Failed to register: \(error)")
}
Add the method addDevice(:Data). This method adds the device token to a list of channels on the PubNub Network.
//Adds the given device token to a list of channels on the PubNub network.
func addDevice(deviceToken: Data) {
    pubNub.addAPNSDevicesOnChannels(
        pushChannels, //list of channels.
        device: deviceToken, //device token generated by APNs
        on: Bundle.main.bundleIdentifier!, //the topic, which is the bundle ID of the project
        environment: .development //environment, either production or development based on token type generated in Apple Dev Program account.
      ) { result in
        switch result {
        case let .success(channelsAdded):
            print("Device successfully added to the following channels:\(dump(channelsAdded))")
        case let .failure(error):
            print("Failed to add device \(deviceToken.description): \(error.localizedDescription)")
        }
      }
}
The API call addAPNSDevicesOnChannels will add the device token to a list of channels (in this case, "Default" and "ch1") using the topic, which is the unique bundle identifier you made in the set-up environment step of the tutorial, and the environment of the application, which will either be .development or .production, based on the certificate and token type generated in your Apple Dev Program account. If you are receiving an error stating the token type is invalid for your app, swap the environment.
Step 5. List Channels, Remove Device & Silent Mobile Push Notifications
You can manage devices you have registered in channels by listing which channels the device is registered in on the PubNub Network and remove a specified device from channels when users no longer wish to receive mobile push notifications. Although the following two functionalities are not used in the tutorial, they are useful to understand when creating a more complex application.
Create a method called listChannels() that returns a list of channels the provided device is registered in that does so by calling pubNub.listAPNSPushChannelRegistrations.
//List the channels the device is registered in on the PubNub Network.
func listChannels(deviceToken: Data) -> [String] {
    var registeredChannels: [String] = []
    pubNub.listAPNSPushChannelRegistrations(
      for: deviceToken,
      on: Bundle.main.bundleIdentifier!,
      environment: .development
    ) { result in
      switch result {
      case let .success(channelsRegistered):
          print("Successully found channels for device: \(dump(channelsRegistered))")
          registeredChannels = channelsRegistered
      case let .failure(error):
          print("Failed to find the device on channels: \(error.localizedDescription)")
      }
    }

    return registeredChannels
}
Create a method called removeDevice() that removes a specified device from the list of provided channels in the PubNub network which does so by calling pubNub.removeAPNSDevicesOnChannels.
//Remove the device from the channels in the PubNub network.
func removeDevice(deviceToken: Data, channels: [String]) {
    pubNub.removeAPNSDevicesOnChannels(
        channels,
        device: deviceToken,
        on: Bundle.main.bundleIdentifier!,
        environment: .development
      ) { result in
        switch result {
        case let .success(channelsRemoved):
            print("Successully removed the device from the following channels: \(dump(channelsRemoved))")
        case let .failure(error):
            print("Failed to remove the device from the channels: \(error.localizedDescription)")
        }
      }
}
Similar to listChannels() and removeDevice(), the method application(_:didReceiveRemoteNotification) is not used in this tutorial, but useful to know when creating more complex applications in the future. This method is used to receive notifications and updates by having the system wake your app in the background without needing to alert the user, and is called whenever there is a "content-available" key included in the push payload. These types of background notifications are also called silent mobile push notifications. You also need to enable the remote notifications capability in your project.
//Handle Silent Mobile Push Notification. Used to notify application when new content becomes available without needing to alert user.
func application( _ application: UIApplication, didReceiveRemoteNotification userInfo: [AnyHashable: Any],
                  fetchCompletionHandler completionHandler: @escaping (UIBackgroundFetchResult) -> Void) {
    /*
     1. Enable Remote Notifications Capability via App -> Targets -> Signing & Capability -> Add Background Modes capability, then select Remote notification checkbox.
     2. Create remote notification that includes only the content-available key, "content-available" : 1. Do not include any keys that would trigger user interactions.
     3. Receive background notification by having the system wake your app in background and calls this handler to silently handle notification.
     */
}
Step 6. Display Notifications
The final code piece to complete this tutorial is to handle and display the mobile push notifications received from APNs. If your application is completely closed or in the background, APNs will handle displaying the notification for you. However, if the application is in the foreground, you need to handle displaying the notification yourself.
At the end of the AppDelegate.swift file you have been working in (after the class AppDelegate declaration), add the UNUserNotificationCenterDelegate as an extension to AppDelegate. Then, add the method userNotificationCenter(_:willPresent:withCompletionHandler:). This method is called whenever a notification arrived while the app was running in the foreground, and you'll have the system display the notification by calling completionHandler(.alert).
//Handle a mobile push notification that arrived while the app was running in the foreground.
extension AppDelegate: UNUserNotificationCenterDelegate {
    func userNotificationCenter(_ center: UNUserNotificationCenter, willPresent notification: UNNotification, withCompletionHandler completionHandler: @escaping (UNNotificationPresentationOptions) -> Void) {
        completionHandler(.alert)
    }
}
Step 7. Run Your Application
You are now ready to test and run your application. Ensure the scheme is set to the getting-started project, and the targeted device is the physical device you connected earlier. This tutorial was created using an iPad mini 4. Press the play button to build and run the application.
A chat room appears for the Default channel. Click in the Type Message section in the bottom section (MessageInput Chat Component) and type a message. Send the message and see the result appear as a new message in the chat (MessageList Chat Component). Your username will be a randomly generated UUID containing six characters, and will be different each time you start the application.
You will see previous messages from other users in this chat room (including yourself) for as many days as you had set in the Message Persistence feature when you created your keys (default is one day). Although this feature is not currently implemented, clicking the number of users icon (top right button) would show the status of the users associated with this chat room (MemberList Chat Component).
To test mobile push notifications, you'll need to have at least two unique users associated with your application. Restart your application to generate a new user. Open a browser and navigate to the PubNub Debug Console, which is used to test various features associated with your application. You will use the debug console to mimic another device or server to send messages over the PubNub Network.
In the Main Settings section in the Debug Console, enter your Publish and Subscribe keys in their respective fields. The channel ID is "Default", and the UUID will be the first user that was generated when you first sent a message in your application.
Above the messages field, click on the "Subscribe to Default" slider to have the debug console subscribe to the Default channel to receive messages sent from the iOS device.
You will now send a message from the Debug Console to your iOS App to mimic another device. The message will contain a mobile push notification section in the payload. Once the message is sent, PubNub inspects the payload; if there is a mobile push notification payload, in this case pn_apns, PubNub will check if the device is registered on the channel. If it is found, PubNub forwards the push to APNs. APNs will then deliver the mobile push notification to the device.
In the debug console, send a message by formatting a message in the Message section.
Format the message as a JSON object. Include the following six fields:
text: The message the user wants to send.type: The type of the message - leave asdefaultas shown below.id: The ID of the message in the PubNub Network. This must be a unique, random string. The example below shows the message with a generated id that is slightly altered from the id sent by the application.createdAt: The timestamp the message was created and sent. This is required by the iOS application to display your message during a given date and time. An example datetime would be "2022-07-22T22:48:31Z".pn_apns: The mobile push notification payload for iOS devices receiving notifications from APNs.pn_apnsconsists of two sub payloads,apsandpn_push. Both are required for PubNub to send mobile push notifications to APNs.The
apspayload is managed by Apple, and is the dictionary that contains the keys used by Apple to deliver the notification to the user's device (alert, category, etc).The
pn_pushpayload contains the configuration of the push message and is used by PubNub to set values as request headers in APNs notifications sent to Apple (push_type, auth_method, targets)
pn_debug: A flag that enables publishing push debuging info the pndebug channel. You can learn more about how to troubleshoot Mobile Push Notifications on PubNub's website.
Below is an example of a message to send to an iOS application receiving notifications from APNs.
{
"text":"Hey there friend!!!",
 "type":"default",
 "id":"aswe234vvowasdadsffpqlasdf",
   "createdAt": "2022-07-22T22:48:31Z",
  "pn_apns": {
    "aps": {
      "alert": {
        "title": "From Admin Portal",
        "body": "Hey there friend!!!"
      }
    },
    "pn_push": [
      {
        "push_type": "alert",
        "auth_method": "token",
        "targets": [
          {
            "environment": "development",
            "topic": "YOUR.APP.BUNDLE.ID.HERE"
          }
        ],
        "version": "v2"
      }
    ]
  },
  "pn_debug": true
}
Click the Publish a message button to send the message. View your connected device - you should see a mobile push notification appear at the top of the screen, as well as the message from the debug console appears in the messages. Place the app in the background, and send the message again in the debug console. Tapping on the notification will open the application and place you back in the chat room. Completely close the application, and send the message again in the debug console. Tapping on the notification will open the application and place you back in the chat room.
Remember: when the app is in the background or completely closed, APNs handles the mobile push notification being displayed. When the app is in the foreground, you are handling the notification being displayed.

Congratulations - what's next?
In this tutorial, you looked at how to add mobile push notifications to an iOS Swift chat application using PubNub. You created an APNs Authentication Token File, set up a PubNub Account, configured and integrated mobile push notifications using APNs into an existing chat application, and successfully generated mobile push notifications to be received in a physical device running the application. The complete application of this tutorial is available in the GitHub Repository, in the push-notifications branch. The source code contains everything performed in this tutorial.
Mobile push notifications are a great way to notify online and offline users about appointments, updates, previews of conversations, special offers, and so much more. Combine this with PubNub’s real-time communication platform, and you have a complete application experience, giving you a way to continually engage and offer value to your users. PubNub’s Mobile Push Gateway makes it easy to send mobile push notifications to your users, by acting as a bridge between the service providers and your application, meaning you don’t have to use different frameworks and SDKs to send different types of mobile push notifications: you can do it all in one place, and let PubNub take care of the rest.
See how PubNub compares
PubNub Vs SendbirdPubNub Vs PusherPubNub Vs StreamExplore our chat docs
PubNub iOS Swift SDK Documentation HomePubNub iOS Chat Components Documentation HomeiOS Push Notifications Documentation OverviewReady to get beyond Proof of Concept?
Schedule a 15 minute chat with one of our experts to get your project moving
Talk to an ExpertTake it to production on your own keys
Create a free PubNub account to get permanent keys for this app.